Difference between revisions of "Lighting Scenarios"
Rwilson131 (Talk | contribs) |
Rwilson131 (Talk | contribs) (Added Screenshots) |
||
| Line 1: | Line 1: | ||
| − | + | {| align="right" | |
| − | + | | __TOC__ | |
| − | + | |} | |
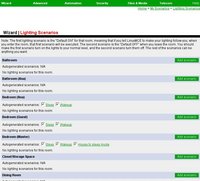
| − | < | + | [[Image:Lightingscenario.jpg|thumb|200px|Lighting Scenario Page]]The lighting scenarios are grouped by room. Whenever you enter a room with the mobile orbiter, or choose a room with a regular orbiter, you will see a button for each of the lighting scenarios you created for that room. |
| − | + | ==Adding a New Scenario== | |
| − | + | To add a new scenario, click the 'Add Scenario' button next to the room you want the lighting scenario to appear in. Note this is not necessarily the room with the lights you want to control. Any lighting scenario can control any light anywhere in your home. This is just the room where you want to see the button. For example, you may want a lighting scenario in the bedroom called 'Go to sleep' which turns off all the lights throughout the house, or a lighting scenario in the kitchen called 'Mealtime' which turns on the lights in the dining room. | |
| + | [[Image:Addinglightingscenario.jpg|thumg|left|500px|Successfully Adding New Lighting Scenario]] | ||
| + | <br style="clear:both;"/> | ||
| + | ==Editing Existing Scenarios== | ||
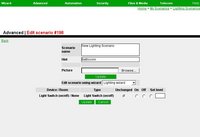
| + | [[Image:Editlightingscenario.jpg|thumb|200px|Edit Lighting Scenario Screen]]To edit an existing scenario, click the 'Edit' link next to the scenario. | ||
| + | |||
| + | Whether adding or editing the scenario, you will see a list of all the lights in the house. For those lights you don't want to be affected by this scenario, just leave the radio button at "Unchanged". That means when you choose this scenario, that light will not change. You can also choose "On", meaning the scenario will turn the light on full brightness, or "Off" to turn it off. "Set Level" lets you type in a level in the text box. The level is a percentage from 0 to 100. If you select "Set Level" and put in "50", then choosing the scenario will dim that light to 50% brightness. You can also preface the Level with a + or - character, meaning a relative change. Then the level can be "+20" or "-10" meaning the scenario will turn the light up 20% or down 10%. Not all types of lights support dimming, and not all dimmable lights support relative dimming. It won't hurt anything to try it. | ||
| + | |||
| + | Next to each device is a "?" button that will show you information the manufacturer provides about that device. This should explain exactly what the device is capable of doing. | ||
| + | |||
| + | If you want this scenario to do something besides just control lights, like maybe turn on some music too, then first use this wizard page to specify the lighting settings, and then click "Advanced" to go to the Advanced Scenario editor. That advanced page is a bit more complicated, but it allows to add any command to the scenario--not just lighting control. | ||
| + | |||
| + | [[Category: Admin Website]] | ||
[[Category: Automation]] | [[Category: Automation]] | ||
Revision as of 06:06, 4 November 2007
Adding a New Scenario
To add a new scenario, click the 'Add Scenario' button next to the room you want the lighting scenario to appear in. Note this is not necessarily the room with the lights you want to control. Any lighting scenario can control any light anywhere in your home. This is just the room where you want to see the button. For example, you may want a lighting scenario in the bedroom called 'Go to sleep' which turns off all the lights throughout the house, or a lighting scenario in the kitchen called 'Mealtime' which turns on the lights in the dining room.
Editing Existing Scenarios
To edit an existing scenario, click the 'Edit' link next to the scenario.Whether adding or editing the scenario, you will see a list of all the lights in the house. For those lights you don't want to be affected by this scenario, just leave the radio button at "Unchanged". That means when you choose this scenario, that light will not change. You can also choose "On", meaning the scenario will turn the light on full brightness, or "Off" to turn it off. "Set Level" lets you type in a level in the text box. The level is a percentage from 0 to 100. If you select "Set Level" and put in "50", then choosing the scenario will dim that light to 50% brightness. You can also preface the Level with a + or - character, meaning a relative change. Then the level can be "+20" or "-10" meaning the scenario will turn the light up 20% or down 10%. Not all types of lights support dimming, and not all dimmable lights support relative dimming. It won't hurt anything to try it.
Next to each device is a "?" button that will show you information the manufacturer provides about that device. This should explain exactly what the device is capable of doing.
If you want this scenario to do something besides just control lights, like maybe turn on some music too, then first use this wizard page to specify the lighting settings, and then click "Advanced" to go to the Advanced Scenario editor. That advanced page is a bit more complicated, but it allows to add any command to the scenario--not just lighting control.


