Difference between revisions of "VPN"
Alblasco1702 (Talk | contribs) m (style from the text) |
|||
| (17 intermediate revisions by 7 users not shown) | |||
| Line 1: | Line 1: | ||
| − | [[Category: | + | {{versioninfo}} |
| − | VPN (Virtual Private Networking) offers a lot of potential for connecting multiple cores (between houses, apartments, etc.). This would enable families and friends to share security cameras, call/intercom each other for free via Asterisk, pipe security notifications to every device at every connected residence, and possibly even share media (legality?) | + | [[Category: Networking]] |
| + | VPN (Virtual Private Networking) provides secure communication to your core when you are away. It also offers a lot of potential for connecting multiple cores (between houses, apartments, etc.). This would enable families and friends to share security cameras, call/intercom each other for free via Asterisk, pipe security notifications to every device at every connected residence, and possibly even share media (legality?) | ||
| + | =VPN in LinuxMCE 1004= | ||
| + | In LinuxMCE 1004 there is an integrated L2TP server. It uses openswan and xl2tpd packages. | ||
| + | |||
| + | ==Setup== | ||
| + | In the web admin -> Advanced -> Network settings, enable the "L2TP/IPSEC VPN server enabled" checkbox. | ||
| + | You also need to fill in the pre-shared key and the IP range the VPN clients should use. Save the settings. | ||
| + | |||
| + | In Wizard -> Basic Info -> Users, check the "Can connect via VPN" for every user that should be able to connect via VPN. Click "Change VPN Password" for the user and enter a password for your VPN connection. | ||
| + | == from 1004 == | ||
| + | Username=pluto_"then the username from lmce".<br /> | ||
| + | Password="lmce password for the user".<br /> | ||
| + | select an ip or leave it to automatic.<br /> | ||
| + | select where the user can go troug<br /> | ||
| + | 1. Core only: Client can only connect to the core (192.168.80.1).<br /> | ||
| + | 2. Core localnetwork: Client can connect to the core and local network.<br /> | ||
| + | 3. everywhere: Client can connect to the core the local network and the internet. | ||
| + | == end from 1004 == | ||
| + | |||
| + | * Note: Currently you need to re-enable the user and change his username after any change to the Network settings page as the files are rewritten | ||
| + | |||
| + | ==Client Connection== | ||
| + | Different devices have different GUIs for setting up a VPN, so this is just a general description. To find specific description for your device, do a google search, we don't need descriptions for every possible device added to this article(Thank you!). | ||
| + | |||
| + | Enter your host name, pre-shared key and give the connection a name. The L2TP secret is not used and should be left disabled. Enter your username(case sensitive) and your VPN password. | ||
| + | |||
| + | ==Notes== | ||
| + | If you have another router or ADSL modem or some other device between the core and the internet, you need to make sure it forwards the IPSEC traffic. | ||
| + | You need to forward there ports to the core | ||
| + | * UDP port 500(IPSEC-IKE) | ||
| + | * UDP port 4500(IPSEC-ESP-NAT) | ||
| + | * Protocol 50(ESP) | ||
| + | You need Protocol 50 OR UDP port 4500, not both. Find out what works for you, and disable the other one. Some devices doesn't allow you to forward specific protocols such as ESP, in that case use UDP 4500. | ||
| + | |||
| + | If the device has a IPSEC passthrough, it might be good to enable this too. I'd check both with this setting on and off, as some devices can cause problems with this setting on. | ||
| + | |||
| + | '''Do NOT forward port 1701 (L2TP)''', this would have allowed direct access to the L2TP server, bypassing IPSEC entirely and sending all your data unencrypted. The whole idea is that the IPSEC connection encrypts your data from end to end, and on the server end, this data will be passed on to port 1701 internally. | ||
| + | |||
| + | ==Debug== | ||
| + | As per nature of VPN there is not much debug possibility. VPN servers silently drop wrong packets to not give any information to potential hackers. | ||
| + | Anyway you can debug the connection procedure with tcpdump using the following command: | ||
| + | tcpdump -i any port 500 or port 4500 | ||
| + | You can also monitor authentication procedure with: | ||
| + | tail -f /var/log/auth.log | ||
| + | |||
| + | <b>Note</b>: If auth.log is empty, 12.04 has a bug that set the owner incorrectly- fix via: "sudo chown syslog /var/log/auth.log" from a terminal | ||
| + | |||
| + | From a terminal, you can verify your preshare key here: | ||
| + | /etc/ipsec.secrets | ||
| + | |||
| + | And approved usernames are here: | ||
| + | /etc/ppp/pap-secrets | ||
| + | |||
| + | General configuration is here: | ||
| + | /etc/xl2tpd/xl2tpd.conf | ||
| + | |||
| + | =Old/custom VPN= | ||
| + | The following is a hack to add VPN support to LinuxMCE for version prior to 1004. It may not even work anymore, and I would not recommend it. | ||
| + | |||
| + | ==Installing PPTP and OpenVPN on the core== | ||
| + | Download the patches and vpn package | ||
| + | |||
| + | Apply the diff patch | ||
| + | cd /var/www/lmce-admin ; sudo patch -p0 < /tmp/vpn.svn.diff | ||
| + | |||
| + | Install the php scripts | ||
| + | cd /var/www/lmce-admin ; sudo tar -xvf /tmp/vpn-php.tar | ||
| + | |||
| + | Install the package | ||
| + | sudo dpkg -i /tmp/lmce-vpn-scripts_1-2_all.deb | ||
| + | |||
| + | Now go to the web admin -> users and check out your new links. | ||
| + | |||
| + | [[Image:Vpn1.jpg]] | ||
| + | |||
| + | Click the PPTP Password link to set up PPTP and set user passwords. Click "Delete User" to disable PPTP for that user only. | ||
| + | |||
| + | [[Image:PPTP1.jpg]] | ||
| + | |||
| + | Click OpenVPN Config to set up OpenVPN and generate user configurations | ||
| + | |||
| + | [[Image:Openvpn1.jpg]] | ||
| + | |||
| + | Once the set up is finished, you can download the configs or Delete the user. | ||
| + | |||
| + | [[Image:Openvpn2.jpg]] | ||
| + | |||
| + | ==Setting up the VPN clients== | ||
==Requirements for a VPN plugin== | ==Requirements for a VPN plugin== | ||
| Line 18: | Line 106: | ||
==External Links== | ==External Links== | ||
#[http://openvpn.net/ OpenVPN] | #[http://openvpn.net/ OpenVPN] | ||
| + | |||
| + | |||
| + | ==PROBABLY GOING TO BREAK A LOT OF THINGS- DO NOT FOLLOW THIS UNTIL IT'S REPORTED WORKING- Feb 5, 2014== | ||
| + | #https://help.ubuntu.com/community/L2TPServer | ||
| + | ipsec verify fails on sending bogus ICMP redirects- the following fixed that | ||
| + | |||
| + | Edit /etc/sysctl.conf and add or uncomment the following lines: | ||
| + | |||
| + | net.ipv4.ip_forward=1 | ||
| + | net.ipv4.conf.all.accept_redirects = 0 | ||
| + | net.ipv4.conf.all.send_redirects = 0 | ||
| + | net.ipv4.conf.default.send_redirects = 0 | ||
| + | net.ipv4.conf.eth0.send_redirects = 0 | ||
| + | net.ipv4.conf.default.accept_redirects = 0 | ||
| + | net.ipv4.conf.eth0.accept_redirects = 0 | ||
| + | |||
| + | Reload with: | ||
| + | sudo sysctl -p /etc/sysctl.conf | ||
| + | |||
| + | Doesn't work: https://help.ubuntu.com/community/L2TPServer | ||
Latest revision as of 11:10, 6 March 2015
| Version | Status | Date Updated | Updated By |
|---|---|---|---|
| 710 | Unknown | N/A | N/A |
| 810 | Unknown | N/A | N/A |
| 1004 | Unknown | N/A | N/A |
| 1204 | Unknown | N/A | N/A |
| 1404 | Unknown | N/A | N/A |
| Usage Information | |||
VPN (Virtual Private Networking) provides secure communication to your core when you are away. It also offers a lot of potential for connecting multiple cores (between houses, apartments, etc.). This would enable families and friends to share security cameras, call/intercom each other for free via Asterisk, pipe security notifications to every device at every connected residence, and possibly even share media (legality?)
Contents
VPN in LinuxMCE 1004
In LinuxMCE 1004 there is an integrated L2TP server. It uses openswan and xl2tpd packages.
Setup
In the web admin -> Advanced -> Network settings, enable the "L2TP/IPSEC VPN server enabled" checkbox. You also need to fill in the pre-shared key and the IP range the VPN clients should use. Save the settings.
In Wizard -> Basic Info -> Users, check the "Can connect via VPN" for every user that should be able to connect via VPN. Click "Change VPN Password" for the user and enter a password for your VPN connection.
from 1004
Username=pluto_"then the username from lmce".
Password="lmce password for the user".
select an ip or leave it to automatic.
select where the user can go troug
1. Core only: Client can only connect to the core (192.168.80.1).
2. Core localnetwork: Client can connect to the core and local network.
3. everywhere: Client can connect to the core the local network and the internet.
end from 1004
- Note: Currently you need to re-enable the user and change his username after any change to the Network settings page as the files are rewritten
Client Connection
Different devices have different GUIs for setting up a VPN, so this is just a general description. To find specific description for your device, do a google search, we don't need descriptions for every possible device added to this article(Thank you!).
Enter your host name, pre-shared key and give the connection a name. The L2TP secret is not used and should be left disabled. Enter your username(case sensitive) and your VPN password.
Notes
If you have another router or ADSL modem or some other device between the core and the internet, you need to make sure it forwards the IPSEC traffic. You need to forward there ports to the core
- UDP port 500(IPSEC-IKE)
- UDP port 4500(IPSEC-ESP-NAT)
- Protocol 50(ESP)
You need Protocol 50 OR UDP port 4500, not both. Find out what works for you, and disable the other one. Some devices doesn't allow you to forward specific protocols such as ESP, in that case use UDP 4500.
If the device has a IPSEC passthrough, it might be good to enable this too. I'd check both with this setting on and off, as some devices can cause problems with this setting on.
Do NOT forward port 1701 (L2TP), this would have allowed direct access to the L2TP server, bypassing IPSEC entirely and sending all your data unencrypted. The whole idea is that the IPSEC connection encrypts your data from end to end, and on the server end, this data will be passed on to port 1701 internally.
Debug
As per nature of VPN there is not much debug possibility. VPN servers silently drop wrong packets to not give any information to potential hackers. Anyway you can debug the connection procedure with tcpdump using the following command:
tcpdump -i any port 500 or port 4500
You can also monitor authentication procedure with:
tail -f /var/log/auth.log
Note: If auth.log is empty, 12.04 has a bug that set the owner incorrectly- fix via: "sudo chown syslog /var/log/auth.log" from a terminal
From a terminal, you can verify your preshare key here:
/etc/ipsec.secrets
And approved usernames are here:
/etc/ppp/pap-secrets
General configuration is here:
/etc/xl2tpd/xl2tpd.conf
Old/custom VPN
The following is a hack to add VPN support to LinuxMCE for version prior to 1004. It may not even work anymore, and I would not recommend it.
Installing PPTP and OpenVPN on the core
Download the patches and vpn package
Apply the diff patch
cd /var/www/lmce-admin ; sudo patch -p0 < /tmp/vpn.svn.diff
Install the php scripts
cd /var/www/lmce-admin ; sudo tar -xvf /tmp/vpn-php.tar
Install the package
sudo dpkg -i /tmp/lmce-vpn-scripts_1-2_all.deb
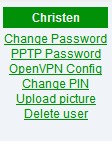
Now go to the web admin -> users and check out your new links.
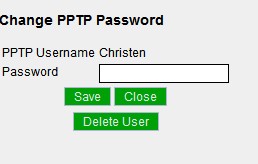
Click the PPTP Password link to set up PPTP and set user passwords. Click "Delete User" to disable PPTP for that user only.
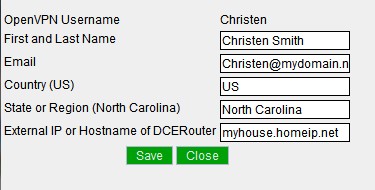
Click OpenVPN Config to set up OpenVPN and generate user configurations
Once the set up is finished, you can download the configs or Delete the user.
Setting up the VPN clients
Requirements for a VPN plugin
- Security
- Encryption
- Secure method of "pairing" houses
This could be done by sharing a public key with whomever you wish to pair with. User 1 would enter User 2's public key along with an optional message. User 2 would manually approve User 1 for pairing, and the cores would connect securly via VPN and automatically share security notifications and anything else set in a settings panel.
- Options panel for data to share with "paired" cores
Wish List
Add what you would like VPN to make possible in LinuxMCE
External Links
PROBABLY GOING TO BREAK A LOT OF THINGS- DO NOT FOLLOW THIS UNTIL IT'S REPORTED WORKING- Feb 5, 2014
ipsec verify fails on sending bogus ICMP redirects- the following fixed that
Edit /etc/sysctl.conf and add or uncomment the following lines:
 net.ipv4.ip_forward=1
 net.ipv4.conf.all.accept_redirects = 0
 net.ipv4.conf.all.send_redirects = 0
 net.ipv4.conf.default.send_redirects = 0
 net.ipv4.conf.eth0.send_redirects = 0
 net.ipv4.conf.default.accept_redirects = 0
 net.ipv4.conf.eth0.accept_redirects = 0
Reload with:
sudo sysctl -p /etc/sysctl.conf
Doesn't work: https://help.ubuntu.com/community/L2TPServer


