Installation Guide
Contents
|
After installation please visit this page and fill in any information you have about the installation process. This will aid the developers in fixing any faults.
If you want to install LinuxMCE using the DVD, follow these steps.
Hardware notes
See this section for general hardware recommendations, and this advice for PC preparation.
LinuxMCE differs from other Home Theater PC systems in that some functions are performed by a Core PC and some functions are performed by a Media Director PC. A hybrid Core/Media Director PC does both.
For the central LinuxMCE Core server that will function on a home automation network, most recommended installations suggest 2 network interface cards (NICs). If you don't have a second NIC card already installed, it is easiest to do so before installing Kubuntu/LinuxMCE, since the second card will then be recognised and configured correctly during the initial installation. You won't have to fiddle with setting it up later, this way.
(If you will have only a single PC acting as a hybrid Core/Media Director, 2 cards aren't strictly necessary, but putting them in at this stage will allow you to expand your network down the line.)
For a PC acting as a Media Director (either as a standalone or as a hybrid), an nVidia graphics card is strongly recommended. If you don't have one installed, it is easiest to do so before starting software installation. It is probably best to stick with an nVidia card on the Core PC as well. Make sure the card is installed prior to software installation.
Check out this video and example installation of a complete installation that took this guy a few days and will likely take you a few weeks.
Kubuntu 7.10 (Gutsy)
Note: LinuxMCE 0704 (beta) was used only with Kubuntu Desktop version 7.04 (Feisty). The current version is LinuxMCE 0710 (RC1) and is meant to be used only with Kubuntu Desktop version 7.10 (Gutsy). A version compatible with Kubuntu version 8.04 (Hardy) is planned for the future.
Steps for installing Linux MCE on an Kubuntu 7.10 (Gutsy Gibbon) system :
Existing Kubuntu 7.10 installation
Using the 2 CD install method (but not the DVD method) you can install LinuxMCE 0710 on a pre-existing installation of Kubuntu 7.10, but to complete the installation you will need a Kubuntu Desktop 7.10 Live CD anyway. Make sure you have one available, or at least a copy of the .iso file somewhere on your hard drive. (If you need to obtain one, see the next section for the download link, and instructions if you want to burn a CD.)
The install process will partially overwrite your previous Kubuntu installation using configuration files from the Live CD which are known to be uniquely compatible with LinuxMCE. If you have previously modified your Kubuntu system subsequent to its original installation, you may lose some of your configuration files because LinuxMCE modifies them to suit its own needs. Therefore, do not install LinuxMCE on a mission-critical PC if you don't want to risk this. You should dedicate one PC to be the LinuxMCE core server, anyway.
New installation
If you don't already have an Kubuntu system installed, follow these generic steps to install Kubuntu Desktop 7.10 from the Live CD:
- Download the CD .iso image for either the 32-bit version or the 64-bit version, depending on your processor. Use the 32-bit version if in doubt. Note that LinuxMCE comes in both a 32-bit and a 64-bit version as well, so you must match. (If the above links are down, try this alternate site for the appropriate Kubuntu Desktop Live CD.)
- If you don't know how to burn the .iso file to a bootable CD, then see these instructions.
- Boot the Kubuntu Desktop 7.10 LiveCD.
- Choose 'Start or install Kubuntu'
- When Kubuntu's desktop appears, click on 'Install'
- A short wizard will start and guide you; Select the language and press 'forward'
- Choose your timezone and press 'forward'
- Select the keyboard layout
- Choose desktop name, a user name and a password. LinuxMCE uses linuxmce for the user and password, so it is often convenient to use linuxmce as the initial user and password at this step, as well.
- Select the partitioning options for your disk. If this is going to be a dedicated server, you can use the entire disk.
- Ready to install.
- Reboot the system and remove the Live CD.
LinuxMCE
Download LinuxMCE
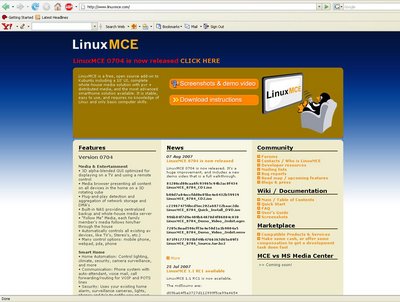
From within the Kubuntu 7.10 desktop, open Konqueror or Firefox (the orange and blue icon at the top), and go to www.linuxmce.com and select 'Download Instructions' to download the LinuxMCE CD images (.iso files) or the DVD .iso image onto your machine. You can also just download directly from this link.
Note that there is a 32-bit version and a 64-bit version of LinuxMCE. If you are using a 64-bit Kubuntu 7.10 installation, download the corresponding LinuxMCE version.
You will be downloading two .iso files, each one corresponding to a CD image. The installer is able to use the .iso files directly from the hard drive, or you can burn them to a CD and then use them from the CD.
(Obviously, if you are downloading the .iso files on another computer, you will have to burn them onto CD to use them.)
To install using the .iso files on your hard drive directly, skip the next step.
Burn download to CDs and install from CDs
(If you plan to install directly from .iso files, skip this step and proceed to the next step.)
If you don't know how to burn an .iso file to a CD then see these instructions.
Burn the two CDs (assuming you are using this method).
You can then simply place CD 1 in the CD-ROM and the installer will autostart. You will be prompted to put CD 2 in the drive, followed by your Kubuntu Desktop Live CD (see later sections).
The rest will take a lot of time but will essentially install automatically. Skip the next two steps and continue with installation prompts.
Installing mce-installer from command prompt
(Skip the next two steps if you are installing from actual CDs.)
You can install the mce-installer from a command prompt without the need to burn the ISOs as follows:
cd /directory/where/the/downloaded/iso/files/are/
mkdir -pv mnt
sudo mount LinuxMCE_0704_CD1.iso mnt/ -o loop
sudo dpkg -i mnt/mce-installer_2.0.1-1_i386.deb
sudo umount mnt
rmdir -v mnt
Installing mce-installer from KDE Menu
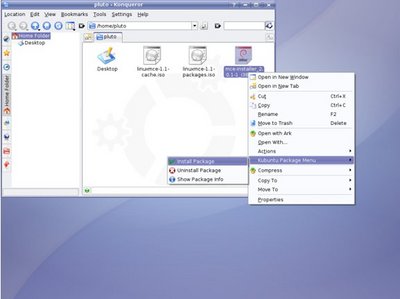
Once you have downloaded the packages, proceed with the installation. First, you have to install mce-installer, which is the software that will guide you through the installation. Right-click on it, go to Kubuntu Package Menu -> Install Package.
Install LinuxMCE
The installer will have put an "Install LinuxMCE" icon on your desktop. Click it to start the installation process. A window will appear saying that you will be notified when updates are available.
Choosing type of Core
Choose if you want a dedicated core or a hybrid. (In brief, a hybrid runs as both the Core and as a Media Director. As such, it needs more computing power. Click here to find out more differences between a core and a hybrid). Then click on the "Forward" button.
If you aren't going to set up an "internal" home automation LAN at this time, but only will use a single PC for all LinuxMCE functions, then make that single PC installation a hybrid.
However, if you will create an entire home automation network, it is better to use one PC as the dedicated core server (not a hybrid). It will run faster. You can leave it "headless" (no monitor, keyboard, mouse), and leave it always on.
Other PCs on an internal home automation network that you later plan to use as Media Directors can be netbooted from the Core server, so you don't need to worry about re-installing LinuxMCE on them.
Choosing Video Card
- Only for nNvidia cards - LinuxMCE will detect that you are using a nVidia Card, but you are not using the proprietary video driver. Only that driver works well with LinuxMCE and nVidia cards and it will ask you it you want to switch to it now.
Network Configuration
The next screen will ask you want to keep your current network configuration or if you want to set your network options manually. The "current network configuration" is usually what the Kubuntu Live CD detected and setup automatically. Most commonly this is set to instruct the PC to ask for a dynamic IP from your home LAN router's DHCP service. This option is basically asking whether your LinuxMCE should continue to ask for a dynamic IP from your external home LAN's router DHCP, or whether you want to set a static IP address for the LinuxMCE PC. This setting applies only to the first NIC card that is connected to your "external" home LAN. Usually keeping the "current network configuration" is sufficient. Then press "Forward".
If you chose manual installation, you must now choose whether your PC will use a static IP in your external home LAN, or whether it will accept a dynamic IP assigned by the router's DHCP. If you do not have a home LAN and router, but connect directly through a cable modem, you most likely use a (static) IP that your cable company assigned you. Generally you have to know that IP address, the gateway, and DNS server information which your cable provider gave you. Most DSL providers use DHCP-assigned dynamic IPs, so if you connect directly through a DSL modem, you most likely use DHCP. You don't have to worry about the gateway and DNS server; DHCP usually discovers those for you automatically. Obviously, if you bought a static IP service from a DSL or T1 provider, you would have to choose static and fill in the information, just as for a cable modem.
If you don't know what the heck you have, use DHCP.
Choosing Mirror for Packages
You have to choose a mirror. Pick one geographically close to you. Downloads will be faster.
Choosing DHCP Server
You will be asked whether you want (the LinuxMCE core server) to Run a DHCP Server or not. The LinuxMCE core server will be the DHCP server for your "internal" home automation network in order to provide plug-and-play detection of network devices like IP Cameras and VOIP phones, and to provide network boot images to any other PC's in the internal home automation network that you might want to use as Media Directors.
Hopefully you took some advice and already installed a second NIC card. That second NIC card is used so that LinuxMCE can provide an "internal" DHCP network to the PCs (Media Directors), Orbiters, and devices within your automated home network. All ethernet connections from these devices (within the home automation network) must be connected to a switch (or a router with DHCP turned off) which is then in turn connected to this second NIC card. The LinuxMCE core server then performs the DHCP functions for the "internal" home automation network.
In essence, the "internal" home automation network is nested within your "external" home LAN. Some PCs can remain outside of the internal home automation network by being directly connected to the router, and therefore not connected to the LinuxMCE server. The first NIC card of the LinuxMCE server therefore communicates to the router of your external home LAN. The second NIC is connected to the internal home automation LAN. The LinuxMCE core server only acts as the DHCP server for the devices in the internal home automation LAN. Savvy?
Generally, you should answer yes to this question. The only time you would answer no is when you will have only one PC that will be a hybrid core server/media director and you do not plan to use any plug-n-play devices other than those connected directly to that single PC.
You will be then asked if you want to keep the default Internal Network address for the internal home automation LAN or if you want to change it. You might as well accept the default, unless you have some specific reason for specifying a unique IP range.
Then press 'Forward'.
Choosing Orbiter Interface
In the next window you need to choose what interface you want to use and you have to pick one of three possibilities. There are currently three options: UI1, UI2 with masking, and UI2 with alpha-blending. UI2 requires specific video cards (nVidia). It is best to choose UI1 for the initial installation if you don't have the appropriate nVidia card or if in doubt, as the interface can be changed later. This will reduce the possibility of video card related errors during installation. After installation, you can check to see if your video card can do masking and alpha-blending by following the instructions at Graphics Test.
Installing Additional Packages
On the next step you have to choose if you want to install lame and libdvdcss and if it is legal in your country to use them. In general you will want to install them both.
Choosing How to Primarily Use the Computer
You have to select how do you plan to use your computer, either:
Primarily used as a PC -- you can start LMCE manually when you need it
or
A dedicated LinuxMCE -- you can start Kubuntu when you need it.
For the dedicated core server, choose the second option. If you have a power outage, you can then set the computer to auto-reboot and restore your system without intervention. If you are serious about home automation, you need a dedicated core server, anyway.
However, see the caveat at the bottom of the page. At this time, it is not easy to bring up the Kubuntu desktop when running in a dedicated LinuxMCE environment. In general this may not matter, since you can still get to Kubuntu with a couple of keystrokes.
The first option either requires scripting and/or cron scheduling in the event of a power outage, or some manual intervention to restart the system. If you are just experimenting with LinuxMCE, this option is ok, and certainly you would have direct access to the Kubuntu desktop at all times. Although most Media Directors are usually netbooted, you can also use this option when installing LinuxMCE on a Media Director that will not netboot, and which you want to also use as a PC.
Installing LinuxMCE Discs
This step is very important. You have to insert the CD (or point to the location on the hard drive of the .iso file for the CD):
LinuxMCE CD 1
LinuxMCE CD 2
Kubuntu 7.10 Live CD
You can see the message about the Linux MCE system installation.
Installation can take a long time
Don't worry if the system seems to stop at points or report what seems like error messages. This is normal since at places it will be testing drivers out, and is only there for the advanced Linux user. You will get a dialog box if something really does go wrong. And, understand this may take a very long time since it will in parallel be updating your Kubuntu system to the latest version. Just leave it for an hour or two and come back later.
Installation Complete
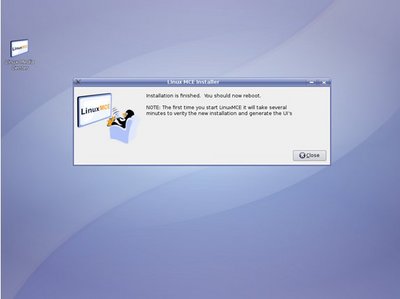
After the installation is done you’ll receive a message from the installer that will tell you to restart the system
Next follow the QuickStart Guide to tell LinuxMCE about how you want to use it.
Additional Notes
Note that if you specified the option for LinuxMCE to startup by default, then after rebooting you'll have LinuxMCE, not Kubuntu. If you will only use this as a media pc, that's fine; you won't ever need to access the Kubuntu desktop to set anything up anyway, and you can do it all from a LinuxMCE Orbiter interface (using a remote control), or from the LMCE web admin panel (using the web browser of any Media Director PC in the network).
If you want to use this PC as a normal Kubuntu PC as well, however, and you want to start-up Kubuntu after LinuxMCE is already running, there isn't an icon yet to switch to Kubuntu from within LinuxMCE. Instead, you must press Ctrl+Alt+F2, login, and then type StartX.
If you specified Kubuntu to run by default, it will boot to the Kubuntu desktop. You can then choose Applications-->Sound & Video-->Start Media Center to start LinuxMCE manually. When both LinuxMCE and Kubuntu are running, you can toggle between them by pressing Ctrl+Alt+F7 for Kubuntu, and Ctrl+Alt+F11 for LinuxMCE. Once you start LinuxMCE, however, there is currently no way to stop it. (This is not true with Core services, which can be started and stopped at will.) Kubuntu integration is still a work in progress.


